
← Back to the Import tab overview
The Import tab
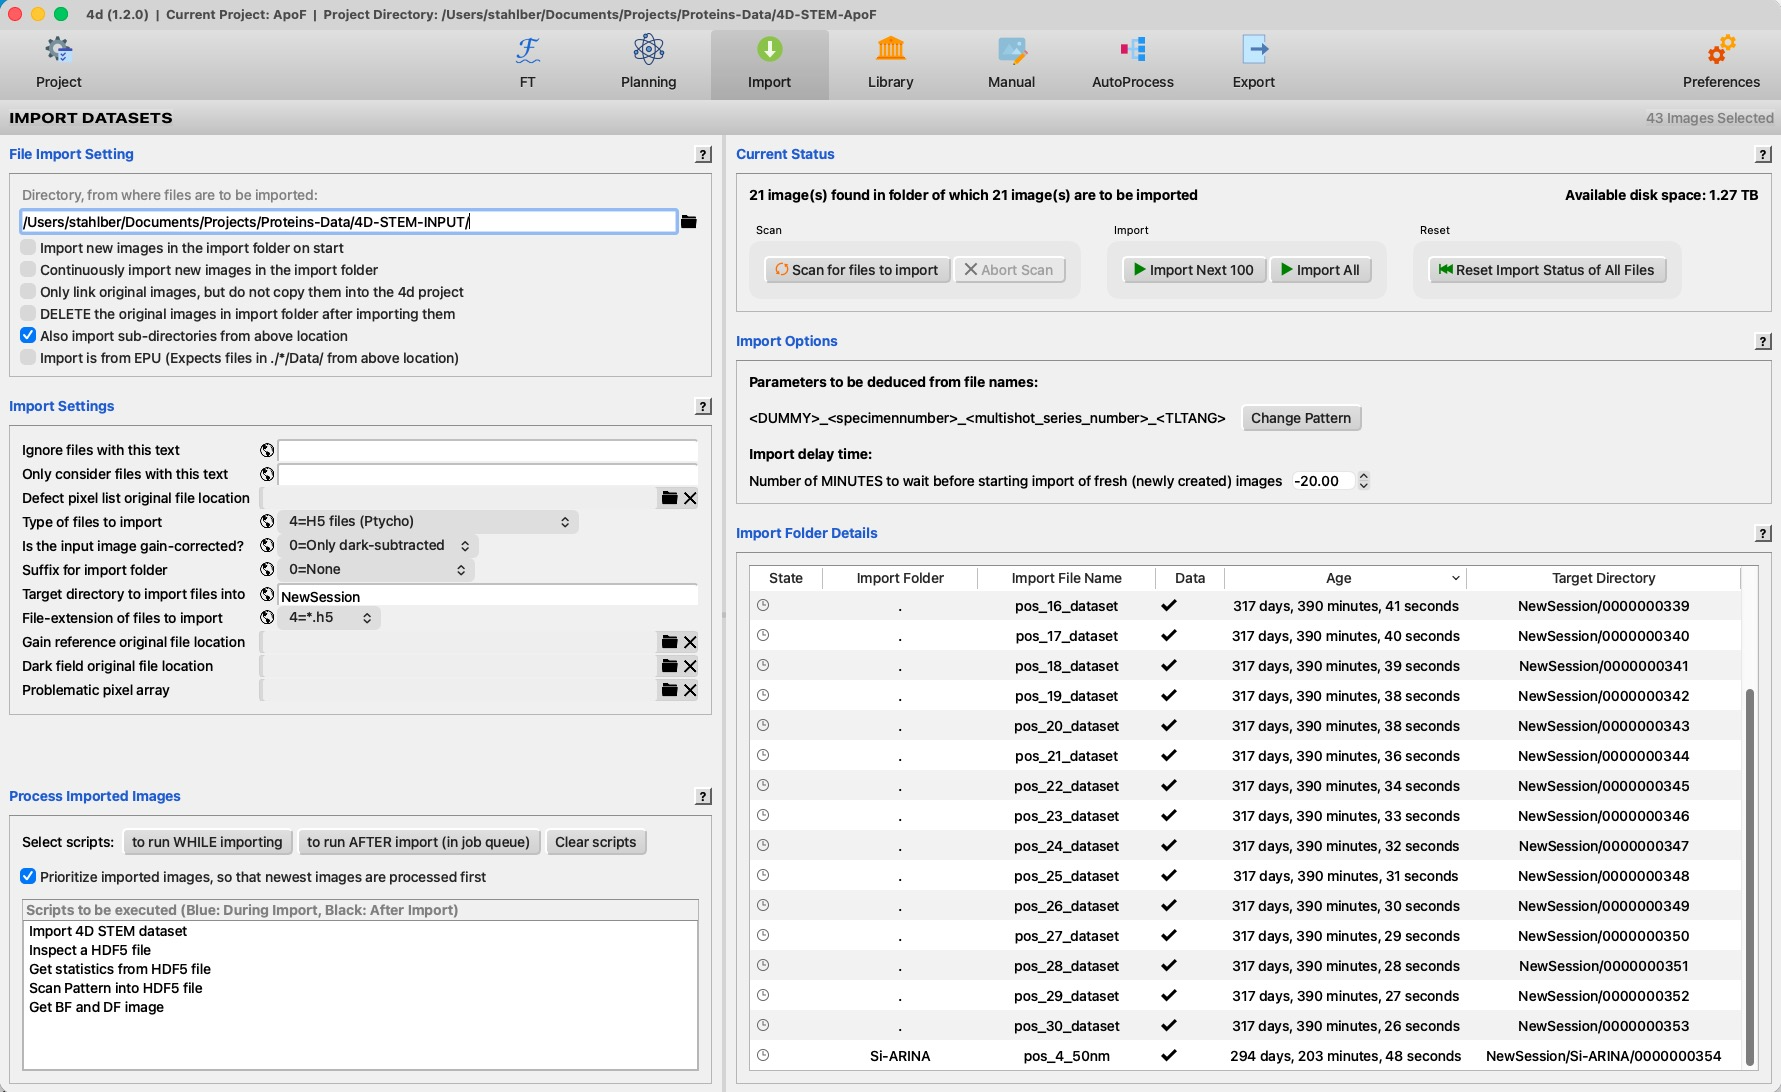
The Import tab watches a folder and brings new microscope files into the project as datasets, optionally processing them on arrival. The window is a two-column split: the left column defines what to import and how, while the right column drives and monitors the import. It is built from six panels, each with a blue title and its own ? button that opens the matching section of this page; the ? at the right end of the IMPORT DATASETS title bar opens the top of the page.
The numbered markers on the screenshot point to each region; the legend and the sections below explain them.
 1
2
3
4
5
6
7
1
2
3
4
5
6
7
| # | Panel | What it is and does |
|---|---|---|
| 1 | Title bar | The IMPORT DATASETS title line; the ? help button at its right end opens this page. |
| 2 | File Import Setting | The source folder and the import-mode checkboxes (on-start, continuous, link-only, delete, sub-directories, EPU). |
| 3 | Import Settings | The import parameters: file filters, file type and extension, gain/dark references, target group. |
| 4 | Process Imported Images | Which processing scripts run automatically as data arrives, and in which order. |
| 5 | Current Status | Drive and monitor the import: scan, import, and reset buttons, with the live status and disk-space display. |
| 6 | Import Options | File-name parsing (metadata deduced from file names) and the import delay time. |
| 7 | Import Folder Details | A live table of every file found in the import folder and its progress through import. |
File Import Setting — source folder & import mode
Defines where raw files come from and the ground rules for bringing them
in. It contains a directory browser for the import folder
(stored as the project's import_dir) and a set of mode checkboxes:
- Import new images … on start — automatically scan and import when the project opens.
- Continuously import new images — keep watching the folder and import fresh files as they appear (subject to the import delay in Import Options).
- Only link original images — reference the originals in place instead of copying them into the project (saves disk space). Mutually exclusive with delete.
- DELETE the original images after importing — remove each source file once imported. A red warning is shown while this is active; it is mutually exclusive with link only.
- Also import sub-directories from above location — additionally
scan one level of sub-directories below the chosen folder and import the
files found in them. Each source sub-directory's files are placed into the target
group under a sub-directory of the same name, i.e.
import_target_group/<sub-directory-name>/<number>, and those nested images appear in the Library as their own groups. Only the immediate sub-directories are scanned (not deeper), and it is mutually exclusive with Import is from EPU. - Import is from EPU — expect Thermo-Fisher EPU layouts (files in
./*/Data/below the chosen folder); reveals the extra XML column.
Import Settings — import parameters
The parameter form for the import itself, populated from the project's import
parameter lists (e.g. import.params.list,
import_nonEPU.params.list). Typical entries include text filters
(ignore / only consider files containing a given text), the
type of files to import (e.g. H5 files for ptychography) and
their file extension, whether the input is already gain-corrected, the gain- and
dark-reference file locations, defect/problematic pixel lists, and the
target image group into which new datasets are placed. These are
ordinary 4d parameters, so their labels,
types, and tooltips come from the central parameter definitions and their values
are saved with the project.
Process Imported Images — run scripts on arrival
Chooses which processing scripts run automatically as data arrives. Two script lists are combined here:
- to run WHILE importing — executed sequentially as each dataset is imported.
- to run AFTER import (in job queue) — handed to the parallel AutoProcess batch queue.
- Clear scripts — empty both lists.
- A prioritize newest-first option controls queue order.
The combined selection is shown in the list “Scripts to be executed (Blue: During Import, Black: After Import)”, colour-coded by when each runs.
Current Status — drive & monitor the import
The control centre for the import, with a live status line (“N image(s) found in folder of which N image(s) are to be imported”) and a free-disk-space indicator, plus three button groups:
- Scan — Scan for files to import to look for files, or Abort Scan (useful when a folder holds tens of thousands of files).
- Import — Import 10 imports the next 10 of the discovered files (click it again to import the next 10, and so on), or Import All imports all of them.
- Reset — Reset Import Status of All Files, marking them unimported again.
When the delete originals option is active, a red warning banner appears here.
Import Options — file-name parsing & delay
Two acquisition-specific settings:
- Parameters to be deduced from file names — shows the expected
file-name pattern (e.g.
<DUMMY>_<specimennumber>_<multishot_series_number>_<TLTANG>) and a Change Pattern button that opens the file-name parser, letting 4d extract metadata (e.g. image number) from each filename. - Import delay time — the number of minutes to wait before importing a freshly created file, so acquisition can finish writing it first.
Import Folder Details — the files table
A live table of every file found in the import folder and its progress through import, with columns:
| Column | Meaning |
|---|---|
| State | Import state (waiting, importing, imported, …). |
| Import Folder | Source subfolder the file was found in. |
| Import File Name | Original file name. |
| Data | The data file. |
| XML | Associated metadata file (shown for EPU imports). |
| Age | How long ago the file was created. |
| Target Directory | Where the dataset is placed inside the project. |