
Python Environments
Many of 4d’s processing scripts are written in Python and are executed through a Python interpreter. The Python Environments section on the Software page of the Preferences dialog is where you tell 4d which Python installations exist on your computer and which one to use. 4d scans the system for environments automatically (conda, venv, pyenv and the system Python) and lists them in the table; you can additionally register custom environments by hand. One environment is marked as the default — that is the interpreter 4d uses to run its Python scripts.
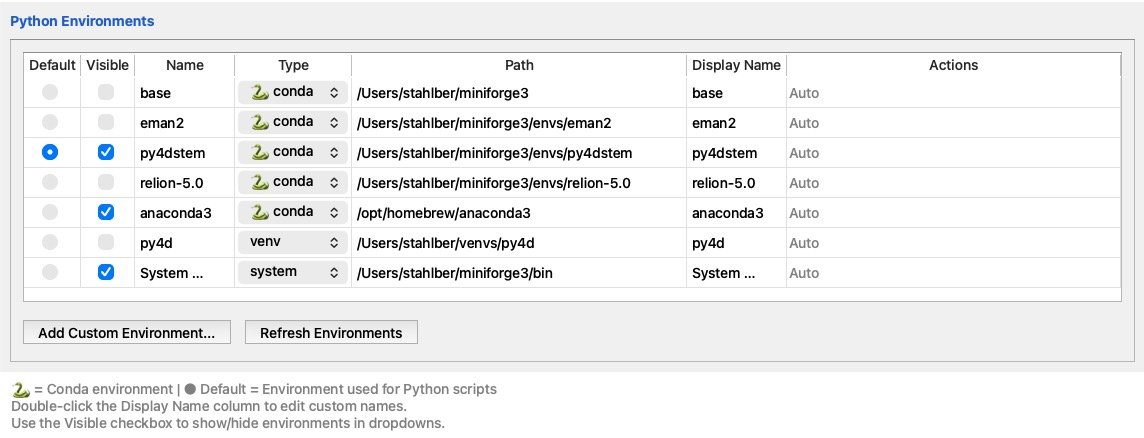
The numbered markers on the screenshot point to each region; the legend and the sections below explain them. The ? button at the right end of the Python Environments title line opens this page.
 1
2
3
4
5
6
7
8
9
10
1
2
3
4
5
6
7
8
9
10
| # | Region / column | What it is and does |
|---|---|---|
| 1 | Default | A radio button per row; exactly one environment is the default. The default environment is the interpreter used to run 4d’s Python processing scripts. |
| 2 | Visible | A check-box that shows or hides the environment in the environment drop-down menus elsewhere in 4d. Un-check environments you never use to keep those menus short. |
| 3 | Name | The environment’s detected name (e.g. the conda environment name). Not editable. |
| 4 | Type | The environment type — conda (marked 🐍), venv, pyenv, system or custom. A drop-down lets you correct the type if the detection guessed wrong — see Environment types. |
| 5 | Path | The environment’s installation directory (or the path to its Python executable). Not editable; hover for the full path. |
| 6 | Display Name | The name shown for this environment in 4d’s menus. Double-click to edit and give an environment a friendlier name. |
| 7 | Actions | Auto for automatically detected environments; a Remove button for environments you added by hand — see Custom environments. |
| 8 | Add Custom Environment… | Registers a Python environment that the automatic scan did not find. |
| 9 | Refresh Environments | Re-runs the automatic detection. While the scan runs, a “Detecting environments…” progress indicator is shown and the table is briefly disabled. |
| 10 | Legend | A reminder of the 🐍 conda marker, the meaning of Default, and the double-click/Visible shortcuts. |
py4dstem for 4D STEM processing) and
mark it as the Default. Changing the default takes effect for the
next script run. Individual scripts can override the default with an
# ENV: label — see
Per-script environments.Until you make that choice, 4d picks the default on its own. It takes the
first match from: an environment named 4d, py4dstem,
py4d or 4dstem; any environment that has py4DSTEM
installed; the conda base environment; the system Python; the first
visible environment. That ordering keeps a fresh installation off base,
which usually has neither py4DSTEM nor HDF5 installed. Once you mark a default
yourself it is stored in ~/.4d/python_environments.json and is used
in place of the automatic pick.
Environment types
The Type column (4) records how an environment is managed:
| Type | Meaning |
|---|---|
🐍 conda | A conda / miniforge / anaconda environment (the base environment and every environment under envs/). |
venv | A virtual environment created with Python’s built-in venv (or virtualenv) module. |
pyenv | A Python version installed and managed by pyenv. |
system | The Python interpreter found on the system PATH. |
custom | An environment you registered manually with Add Custom Environment…. |
Custom environments
If an environment is not found by the automatic scan (for example an installation
in an unusual location, or on a network drive), click
Add Custom Environment… (8). You are first asked for the
environment’s directory; if you cancel that, you can instead
pick the Python executable itself (python,
python3 or python.exe). Finally you can give the new
entry a display name (leave it empty to use an automatic name).
Custom environments show a Remove button in the Actions column (7); automatically detected environments cannot be removed and show Auto instead — if one disappears from your system, it drops out of the list on the next Refresh Environments (9).
Per-script environments — the # ENV: label
Different processing packages often need mutually incompatible
Python setups: py4dstem may require one specific configuration, while
torchslice needs a different one — for example because the two demand
different NumPy versions that cannot coexist in a single environment. A single
default interpreter therefore cannot serve every script. To solve this, a script
can declare which environment it wants with an # ENV: label in its
header — one of the #-comment labels (like # DISPLAY:
and # MANUAL:) within the first 20 lines of the script:
# ENV: py4d
The script scripts/image/torchslice/20_shadowimage.py (Shadow
Montage) uses exactly this line to request the py4d environment,
regardless of what the global default is set to. The name after
# ENV: must match the environment’s Name
(column 3) in the table above; it may optionally be written in quotes
(# ENV: "py4d").
When you select a Python script in the Manual Processing window, the Python-environment selector next to the Run button is preset automatically. Several sources can propose an environment; the first one that applies wins:
| Priority | Source | Meaning |
|---|---|---|
| 1 | Manual selection | An environment you picked by hand in the selector for this script during the current session. |
| 2 | Saved with the dataset | The environment used the last time this script was run on this dataset (persisted across sessions). |
| 3 | # ENV: label | The environment the script itself declares in its header. |
| 4 | Global default | The environment marked Default (1) in the table above. |
When a script declares an # ENV: label, a small ↻
reset button appears next to the environment selector: it returns the selector to
the script’s declared environment and clears any manual or per-dataset
override.
# ENV: label.