
← Back to “Projects and project modes”
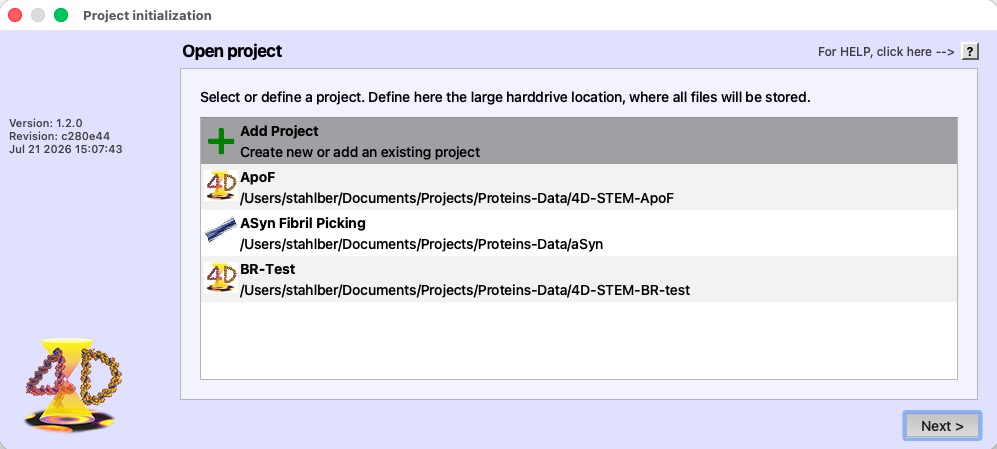
The Open project wizard
When 4d starts, it opens the Project initialization wizard. All
of 4d’s data and results live inside a project — a directory
on a fast local disk — so the first step of every session is to open an existing
project or create a new one. The
 button at the right end of the Open project title line opens this page.
 1
2
3
4
5
6
1
2
3
4
5
6
| # | Region | What it is and does |
|---|---|---|
| 1 | Title row | The Open project title. The “For HELP, click here” note and the ? button sit at its right end and open this page. |
| 2 | Instructions | Choose (or define) the location on a large, fast hard drive where all project files will be stored. |
| 3 | Add Project | Creates a new project or registers an existing one — selecting it and clicking Next > leads to the Add project page below. |
| 4 | Recent projects | The projects 4d already knows, each with the icon of its program mode, its name, and its directory path. Select one and click Next > (or press Enter, or double-click) to open it. |
| 5 | Version info | The 4d version, revision, and build date. |
| 6 | Next > | Opens the selected project, or continues to the Add project page. The arrow keys move the selection; Enter triggers Next. |
Adding a project
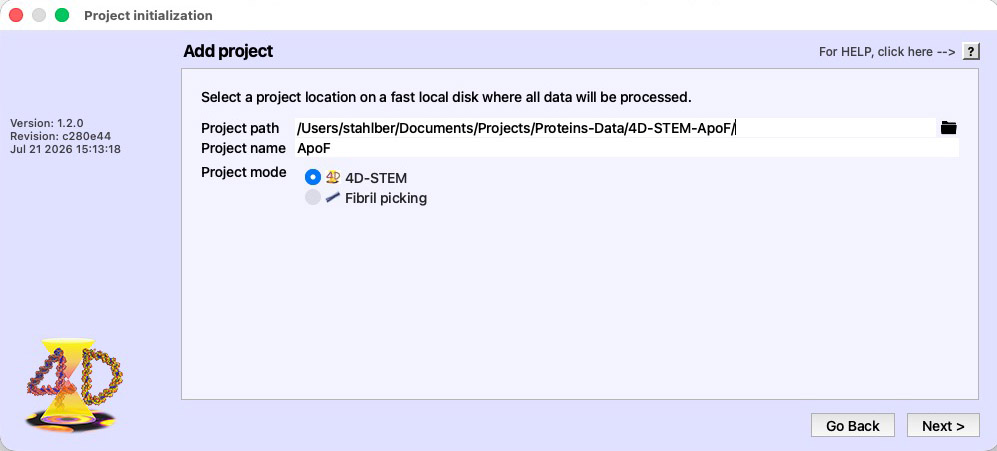
Choosing Add Project leads to the Add project page, where a new project is defined by three things: where it lives, what it is called, and which program mode it uses.
 1
2
3
4
5
6
1
2
3
4
5
6
| # | Region | What it is and does |
|---|---|---|
| 1 | Title row | The Add project title. |
| 2 | Help button | The “For HELP, click here -->” note and the ? button, which opens this page. |
| 3 | Project path | The project directory — pick a location on a fast local disk with plenty of space, since all raw data, intermediate files, and results are processed here. The folder button at the right opens a directory browser. Pointing at an existing 4d project registers it instead of creating a new one. |
| 4 | Project name | The display name of the project (shown in the project list and the window title). It can be changed later with Rename Project on the Project tab. |
| 5 | Project mode | 4D-STEM or Fibril picking — see Program modes below. |
| 6 | Go Back / Next > | Return to the project list, or create the project and open it. |
Program modes: 4D-STEM and Fibril picking
The program mode chosen when a project is created tailors the whole application to a workflow: which processing scripts and tabs are offered, which parameters exist, and which columns the Library table shows. Each project’s mode is indicated by its icon in the project list.
4D-STEM
The main mode, for processing 4D scanning transmission electron microscopy data. A 4D-STEM dataset records a full 2D diffraction pattern (CBED pattern) at every probe position of a scanned area. In this mode 4d offers the complete reconstruction workflow: import of raw detector data into 4d’s HDF5 format, calibration, virtual-detector imaging (bright-field / dark-field), parallax imaging, integrated differential phase contrast (iDPC), and iterative electron ptychography with the SHARP pipeline and the reconstruction engines (py4DSTEM, Torchslice, PtychoBones, ePIE). It also adds the Planning tab for scan-pattern design before acquisition.
Fibril picking
A specialised mode for detecting and analysing amyloid fibrils
in cryo-EM micrographs. A Fibril-picking project is designed to sit
inside an existing RELION project: it points at RELION’s
MotionCorr/ folder, works entirely within its own
fibrilpicker/ subfolder, and does not touch RELION’s files.
Fibrils are picked and traced in the
maximized image inspection view with the
Fibrils script section, and the resulting
coordinates can be exported back for
further processing in RELION.